Installing the System Menu (no WiFi)
Do NOT install ANY Wii IOS using a standard WAD Manager without explicit instruction from this guide if you do not have a WiFi card on your console and are certain it is installed properly. Doing so WILL permanently render your console unusable until a WiFi card is soldered on.
Preface
The Wii mini’s System Menu, while it is the latest version (4.3E/U), has been heavily customized to remove menu items and settings that required the stripped out features from previous Wii models. Specifically:
- It lacks any wireless and wired network settings, WiiConnect24 etc.
- It lacks the option for 480p video, since component cables aren’t normally supported by the Wii mini
- It has the SD card and GameCube Memory card menus removed from the home screen and Data Management.
- It has most features removed from the Wii Message Board besides the basic Calendar.
In order to restore any of these features with hardware mods, replacing the Wii mini System Menu with the original one, as well as replacing some other modified IOS (slot 80 for the System Menu itself, slot 58 for the Homebrew Channel and 36 for legacy homebrew and most disc games), is also needed. However, if you do not have a WiFi card installed, simply installing the original Wii IOS will BRICK the console since it will hang on initializing the card. Instead, a custom tool called Wiini SD Patcher is used to patch out the WiFi module driver from the required IOSes and relatively safely install them.
You will only need to do this once. If you performed a second hardware mod that requires it, such as installing a component mod after an SD card slot mod (or vice versa), you won’t need to reinstall the System Menu again.
Instructions
Section I - Downloading required files
- Download the latest zip release of Wiini SD Patcher, decompress it and place the Wiini-SD-Patcher folder inside the /apps folder located in the root of your USB storage device.
- Determine your Wii mini System menu version.
- On your console’s home menu, navigate to the Wii options in the bottom left corner
- Choose Wii Settings
- Observe the “Ver. 4.3X” writing on the top right of the screen. If you see 4.3E, your console is PAL. If you see 4.3U, your console is NTSC-U.
- Take a note of that information for later.
-
You will also need a tool to download some wads from the Nintendo Update Servers. Follow the instructions for your respective operating system below:
- For Windows, NUS Downloader is the easiest app for downloading Wii WADs, download it from the link above and extract it to a folder of your choice.
- Open NUSD and you should get a window similar to this:
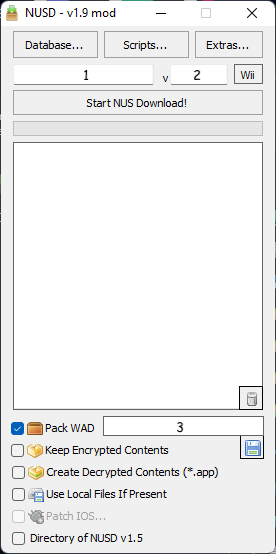
- Untick all boxes except for “Pack WAD”, as seen above.
-
Fill in the numbered fields in NUSD as shown above with the first row of data below, press “Start NUS Download!”, wait for the download to complete then repeat the same for the other rows. Download the 3 IOSes and only the System Menu that corresponds to the region you determined in step I.2.
1 (TID) 2 (version) 3 (filename) 0000000100000024 3608 IOS36-64-3608.wad 000000010000003A 6176 IOS58-64-6176.wad 0000000100000050 6944 IOS80-64-6944.wad 0000000100000002 513 SystemMenu4.3U-v513.wad 0000000100000002 514 SystemMenu4.3E-v514.wad - Open the folder you extracted NUS into, go into
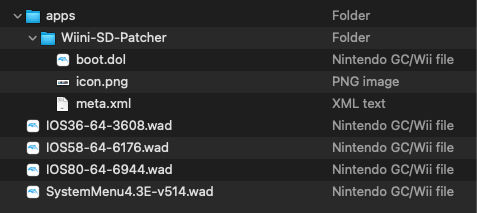
titles, select the search field and type in*.wad. You should get only the 4 files you just downloaded. Copy those to your USB drive, outside any folders it may have.
- For Unix-based systems, Sharpii NetCore is recommended but it does require use of the terminal. Download the latest release of Sharpii NetCore from TheShadowEevee’s GitHub for your operating system and architecture.
- If your machine has an Intel or AMD cpu, choose the x64 build for your Operating System.
- If using an Apple Silicon Mac, choose the MacOSX-arm64 build.
- If using an arm-based Linux box, choose the arm or arm64 build depending on the architecture.
- Decompress the 7z and optionally move the Sharpii executable to a location of your choice.
- Open your Terminal app (on macOS it’s in the Utilities folder in your Launchpad), type
chmod +xand drag the Sharpii binary you just extracted from your file explorer to the terminal window, then hit enter to make it executable.
- Open a terminal window in the folder Sharpii is in (or cd to it)
- For macOS, go one directory above the folder,
Ctrl+Clickthe folder icon > Services > New Terminal at Folder
- For macOS, go one directory above the folder,
- Copy and paste the following commands to your terminal and hit enter one at a time to download the required WADs:
./Sharpii nusd -wad -ios 36 -v 3608 -o IOS36-64-3608.wad./Sharpii nusd -wad -ios 58 -v 6176 -o IOS58-64-6176.wad./Sharpii nusd -wad -ios 80 -v 6944 -o IOS80-64-6944.wadIf in step I.2. you determined your System Menu version to be 4.3U, run the following command:
./Sharpii nusd -wad -id 0000000100000002 -v 513 -o SystemMenu4.3U-v513.wadOtherwise, if you are running 4.3E, run the following:
./Sharpii nusd -wad -id 0000000100000002 -v 514 -o SystemMenu4.3E-v514.wadYou should now have 4 .wad files in the same folder as Sharpii. Copy those to your USB drive, outside any folders it may have.
- Your USB drive should now look something like this:
Section II - Running the Patcher
- Plug in the USB drive to your console, open the Homebrew channel and start Wiini SD Patcher.
- Make sure everything is set to Yes, then press the home button.
- Hold the home button again for 2 seconds.
- Wait for the patcher to complete, if all goes well you should automatically return to the System Menu, and you should immediately notice an SD card icon on the bottom left, which will indicate that the operation was successful.
If you see an error, take a picture or a note of it, the app may return you to the Homebrew channel. Do NOT turn off the console. Join our support discord immediately (link at the top of the page).
Conclusion
The complete Wii System Menu should now be installed and the sd card and other wii-specific features should work in the homebrew channel and most homebrew apps. You can now use any hardware mods you have made that require it.
Note that the Homebrew channel may appear upside-down. That is normal due to the nature of the custom nowifi IOS installed. That issue can be solved by Installing the Open Homebrew Channel wad instead using Wii Mod Lite
BONUS! - Temporary Priiloader fix
Due to the fact that the developer of the Wiini SD patcher is highly incompetent, the patcher currently breaks priiloader and perhaps some other functionality, which may be a problem for some users. It is strongly recommended you follow the steps below to fix the issue, which will be properly fixed in a future release of the patcher, sometime soon™.
- Download the latest release of Priiloader and extract the contents of the zip to your SD card or USB drive.
- Download Wii Mod Lite and extract the contents of the zip to your USB drive.
- Open Wii Mod Lite from the Homebrew Channel, go to WAD Manager and select USB Mass Storage Device.
- Install ONLY the System Menu v4.3 WAD you acquired in section I, do NOT install any of the 3 IOSes because you WILL brick your console.
- Exit Wii Mod Lite, go back to the Homebrew Channel and start the Priiloader Installer. You should now be able to use Priiloader as normal, just keep in mind that you will need to redo any hacks or settings you had applied previously.
- (Optional): Join the Discord and tell Devnol how big an idiot he is.
We’d love to see your completed mod, feel free to join us on our Discord and post a picture in #pimping-general
Return to Pick-a-Pimp | Continue to site navigation
We have other tutorials that you might like.